How to Stripe a Lawn Like a Groundskeeper
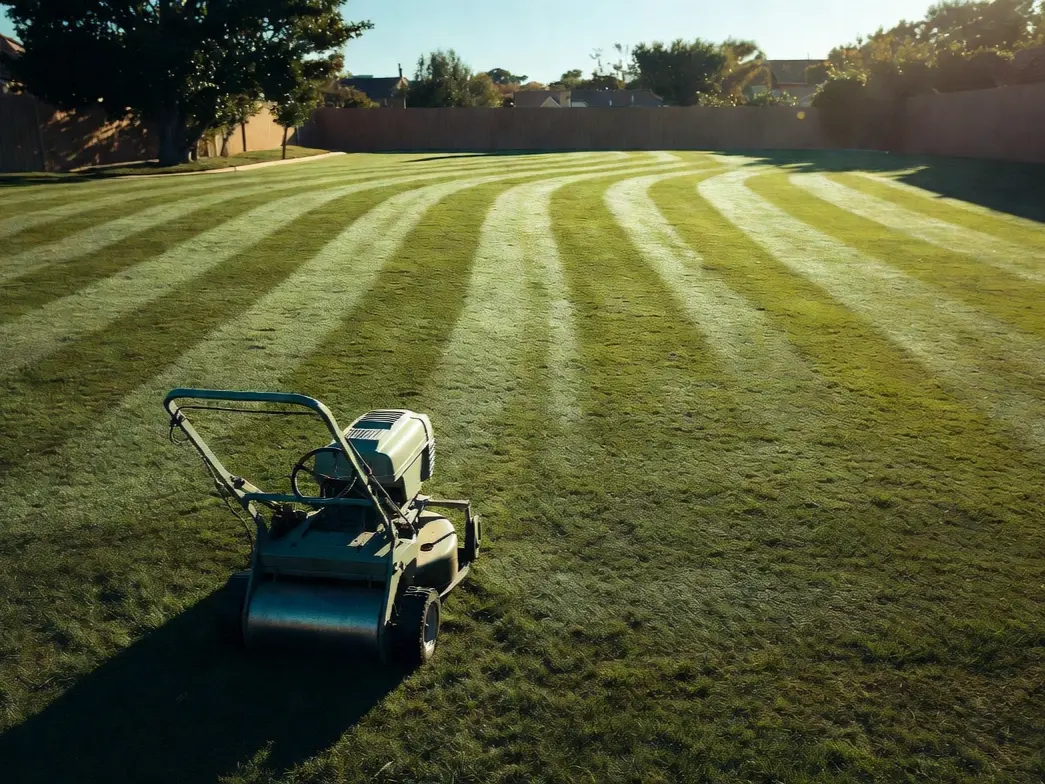
Lawn stripes aren’t a proprietary groundskeeper’s trick — they’re just bent grass. Light hitting grass bent one way reflects brightly; light hitting it bent the other way looks dark. That’s the entire mechanism. A rear roller or striping kit behind your mower does the bending, and mowing adjacent passes in opposite directions creates the alternating light and dark bands.
Get it wrong and you get irregular banding that fades within a day. Get it right and the stripes stay crisp, deepen as the week goes on, and look different at noon than they do at five when the light angle shifts. The difference comes down to three things working together: healthy grass cut at the right height, a roller or striping kit making full-width contact behind the deck, and a perfectly straight first pass that every later pass can reference.
Why Does Grass Stripe in the First Place?
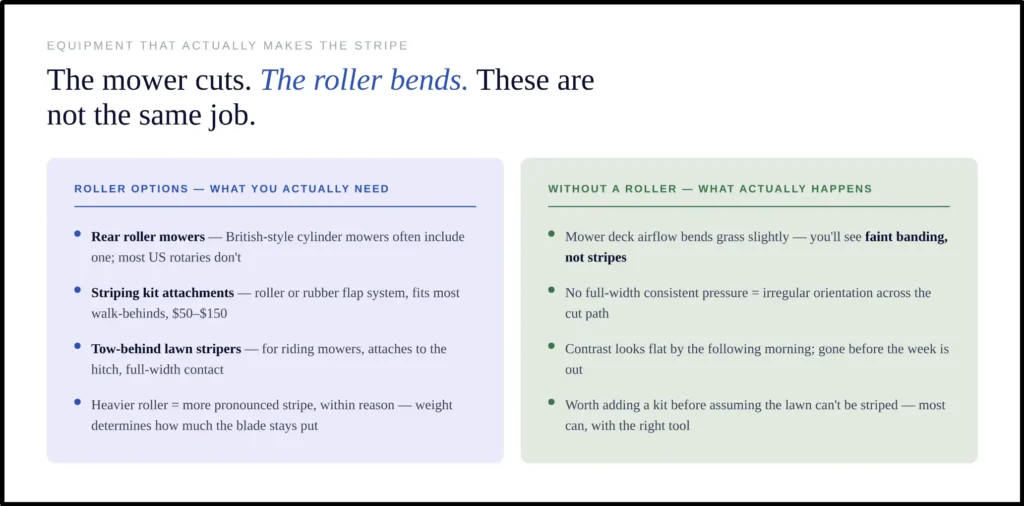
This is the part most explanations skip. The mower blade cuts the grass. The roller bends it. These are separate jobs, and the roller is the one responsible for the stripe. Most residential mowers don’t have rear rollers — they have wheels, maybe anti-scalp rollers, but nothing making full-width contact behind the deck and pressing grass down consistently.
Mow without a roller and you’ll get some striping, since the deck’s airflow bends grass on its own, but it’s faint and inconsistent — not what you’re after. A rear roller changes this completely: it rides behind the cutting deck at the full cut width, pressing every blade flat in the direction of travel. That’s why you need either a mower with a built-in roller or an aftermarket striping kit.
According to turfgrass researchers at Purdue University, cool-season grasses like Kentucky bluegrass and perennial ryegrass can bend up to 45 degrees before springing back — which is exactly what you want for crisp, long-lasting stripes. Warm-season grasses like Bermuda and zoysia have shorter, stiffer blades that resist bending, making them harder to stripe dramatically.
What’s the Best Grass Type for Lawn Stripes?
Striping stressed turf is a waste of time — dry grass, thin grass, or grass that hasn’t been fertilized properly won’t bend cleanly or hold its orientation, and the contrast is flat and gone by Thursday. Grass type matters just as much. Here’s how the most common US lawn grasses compare:
| Grass Type | Striping Quality | Best Mowing Height | Roller Weight Needed | Stripe Longevity |
|---|---|---|---|---|
| Kentucky Bluegrass | ★★★★★ | 2.5 – 3.5 inches | Light (15-20 lbs) | 5-7 days |
| Perennial Ryegrass | ★★★★★ | 2.0 – 3.0 inches | Light (15-20 lbs) | 5-6 days |
| Tall Fescue | ★★★★☆ | 3.0 – 4.0 inches | Medium (20-30 lbs) | 4-6 days |
| Fine Fescue | ★★★☆☆ | 2.0 – 3.0 inches | Light (15-20 lbs) | 3-5 days |
| Bermuda | ★★☆☆☆ | 1.0 – 2.0 inches | Heavy (30+ lbs) | 2-4 days |
| Zoysia | ★★☆☆☆ | 1.5 – 2.5 inches | Heavy (30+ lbs) | 2-4 days |
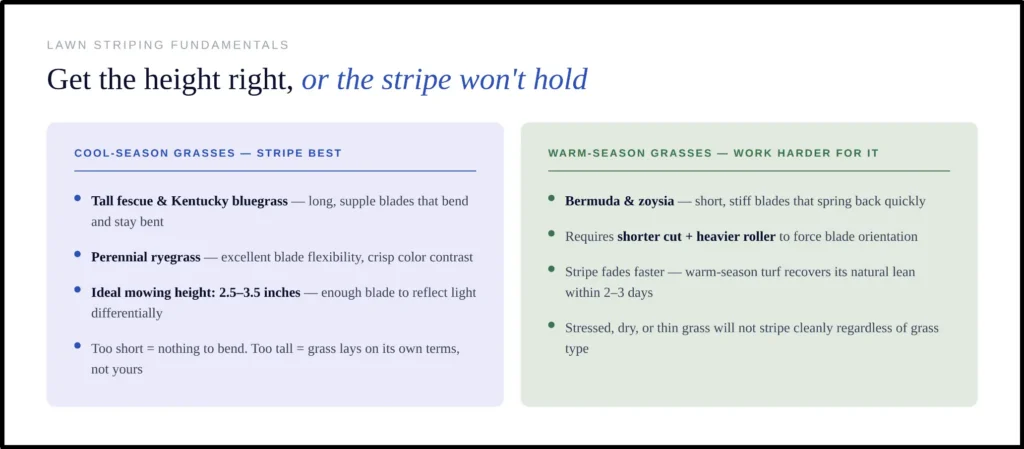
Cool-season grasses stripe better. Tall fescue, Kentucky bluegrass, and perennial ryegrass have long, supple blades that bend and stay bent. Bermuda and zoysia are different animals — short, stiff blades that spring back. You can create some visual effect on warm-season turf by cutting it short and using a heavy roller, but you’re working against the grass rather than with it.
Mowing height matters more than most people expect. For cool-season turf, somewhere between 2.5 and 3.5 inches gives you a blade length that bends visibly without flopping over on itself. Too short and there isn’t enough blade to reflect light differentially; too long and the grass lies however it wants, regardless of what the roller does. Most home lawns are either cut too low because the owner wants it tidy, or left too long because mowing is a chore — neither stripes well.
What Equipment Do You Need to Stripe a Lawn?
A rear roller or striping kit is the one piece of equipment that separates striped lawns from ordinary ones. Without it, you’ll get faint, inconsistent lines from the mower deck’s airflow alone — not the sharp contrast you’re after.
Here’s what you need, from essential to optional:
- Rear roller mower OR striping kit attachment: A striping kit — either a roller attachment or rubber flaps that drag behind the deck — runs $50 to $150 for most walk-behind mowers. Some cylinder mowers come with rollers built in; British-style rotary mowers often do. Most American rotaries don’t, so budget for the attachment.
- Sharp mower blade: A sharp blade cuts cleanly, and the grass seals quickly, standing upright and bending well. A dull blade tears — torn tips turn brown within a day or two, and that browning creates visual noise that muddies the stripe contrast. Sharpen the blade every eight to ten hours of mowing time, more often on sandy soil or when cutting through debris.
- Straight reference line: A string line, a fence, a sidewalk — anything that gives a perfectly straight first pass. This matters more than any piece of equipment, since every later pass references the one before it.
- Heavier roller (optional): If you’re working with Bermuda or zoysia, a DIY PVC roller filled with sand or water (20–40 lbs total) provides the extra weight needed to press stiff blades down. Plans are widely available on YouTube and cost under $30 in materials.
How to Stripe a Lawn: Step-by-Step
This is the same method professional groundskeepers use, adapted for residential equipment:

Step 1: Prepare the Lawn
Water deeply 24–48 hours before mowing if conditions are dry. The grass needs to be hydrated enough to bend without snapping, but not so wet that the roller slips or clumps form. The soil should be firm underfoot. Mow when the grass is dry — wet grass clumps on the roller and creates uneven pressure.
If your lawn has visible dips or bumps, consider topdressing with a thin layer of sand or compost — even small irregularities mean the roller makes inconsistent contact, and the stripes will look ragged from certain angles. It’s not a quick fix, but level ground is the foundation everything else depends on. For soil that’s compacted — if your lawn feels hard underfoot or water pools on the surface after rain — aerating in the fall (or late spring for warm-season turf) makes a significant difference too.
Step 2: Mow a Perimeter Border Strip
The cleanest method is what groundskeepers call a headland turn: mow one full strip around the entire perimeter first — about one mower-width wide — so every turn during the main pattern happens in that border zone instead of cutting into the striped area. Mow the border strip last, once the main pattern is done, to clean up any tire marks.
Step 3: Set Your First Pass
Pick the longest, straightest reference edge available — a fence line, a sidewalk, or a string line stretched across the lawn. The first pass has to be straight, because every later pass references the one before it. A slight kink in pass one becomes a visible wave across the whole lawn by pass ten.
The mistake most people make is staring at the ground immediately in front of the mower — that’s what causes constant overcorrection, small adjustments that compound into curves. Look at the far end of the run instead: a fence post, a tree, the corner of a building. Pick a fixed point and drive toward it. The stripe takes care of itself when your eyes are where they should be.
Step 4: Mow Alternating Passes
One pass isn’t a stripe — one pass is just cutting the grass. The stripe becomes visible only once you mow adjacent strips in opposite directions, one going north, the next south, alternating across the width. That alternation is what creates the contrast between bright and dark bands.
Overlap each pass by about 2–3 inches — roughly the width of your hand. Too little and you’ll leave thin uncut strips between passes; too much and you waste time and compact the grass.
Step 5: Turn Clean at the Ends
How you turn at the end of each pass determines whether your stripes stay parallel or drift apart over multiple passes — sloppy turns, wide arcs, and wheels cutting into the adjacent stripe will show up in the finished pattern. Lift the mower deck slightly as you turn, if your mower allows it, then drop it back down once you’re lined up for the return; this keeps the deck from scalping the grass at the turn point and leaving bare patches that break the pattern. Tight, clean turns — all happening inside the border strip — keep things crisp.
Step 6: Rotate Direction Every 2–3 Mowings
The grass starts to lean permanently if you always stripe the same direction — the roots actually tilt over time, and after a few months you’ll notice the contrast fading because nothing pushes back against the established lean. Rotate ninety degrees every few mowings, or go diagonal. The turf stays healthier, the stripes stay sharper, and you get more pattern options without any extra work.
Lawn Striping Patterns: Beyond Basic Stripes
Once you’ve mastered the basic straight stripe, you can create more complex patterns by changing your mowing direction between sessions:
- Checkerboard: Stripe the entire lawn in one direction (say north-south). Next time you mow, stripe east-west across the first pattern. The intersecting bright-and-dark bands create a checkerboard. Dark areas form where two dark stripes intersect; light areas form where two bright stripes cross.
- Diagonal stripes: Mow at a 45-degree angle to the property line. Diagonal stripes make a lawn look wider — useful if you have a narrow yard.
- Double stripe (skip-stripe): Mow two adjacent passes in the same direction, then two in the opposite direction. This creates wider bands that are more visible from a distance — popular on sports fields.
- Wave or contour: Follow the natural contour of the landscape rather than a straight line. This works better on irregularly shaped lawns and looks more natural than trying to force straight lines across uneven terrain.
What Are the Most Common Lawn Striping Mistakes?
Here’s what breaks the pattern most often:
Mistake #1: Striping Stressed or Dry Grass
The problem: when grass is drought-stressed or underfed, the blades become brittle. Running a roller over brittle grass doesn’t bend it — it breaks it. You’ll end up with brown, ragged stripes that look worse than no stripes at all.
The fix: water to a depth of 1–2 inches per week (use a tuna can to measure — when it’s full, you’ve watered enough), fertilize on schedule, and only attempt striping when the grass is actively growing and healthy.
Mistake #2: Using Dull Blades
Dull blades kill stripe contrast faster than anything else. A sharp blade makes a clean cut that seals quickly, and the grass blade stays upright and bends well. A dull blade tears the grass tips, which turn brown within a day or two. That browning creates visual noise that washes out the light-dark contrast. Sharpen the blade every 8–10 mowing hours — more often if you’re hitting sandy soil.
Mistake #3: Starting Without a Straight Reference
Here’s what happens: you eyeball the first pass. It looks straight enough. By pass eight, the subtle curve you started with has amplified into a visible arc across the entire lawn. Now your stripes look amateur no matter how good the grass is.
The fix takes 30 seconds: stretch a string line or sight along a fence edge for your first pass. Everything after that just traces the line before it.
Mistake #4: Never Changing Direction
The grass leans permanently after a few months of striping the same direction — the contrast fades because every blade is already leaning that way. Rotate 90 degrees every 2–3 mowings to push the grass back the other direction; this conditions the turf evenly and keeps stripes sharp season-long.
How Do You Maintain Lawn Stripes After Mowing?
The first 24–48 hours after mowing determine how good your stripes look all week:
- Water lightly after striping if conditions are dry — not to the point of runoff, just enough to firm the grass back up and help it hold the position it was pressed into.
- Minimize foot traffic across the striped area. One person cutting across the pattern on their way to the shed doesn’t ruin anything. A dog running laps will.
- Stripes look best two to three days after mowing, once the grass has settled and the contrast has deepened. It fades as the grass grows and stands upright again — usually by day five or six on actively growing turf, longer in slower-growing seasons.
- Mow again once the stripe fades, and do it right again. That’s the job. Let growth rate set the schedule, not the calendar — in spring you might mow every 4–5 days to maintain stripes, while summer heat can stretch that to 7–10 days.
Why Do My Lawn Stripes Fade So Fast?
Stressed grass won’t bend cleanly, won’t hold orientation, and won’t give you the contrast you’re looking for. The pattern reveals your lawn’s condition more honestly than anything else:
- Underwatering: Dry grass blades spring back faster because they’re lighter and stiffer. Consistent watering is most of the equation — the lawn tells you what it needs, and an irrigation system that responds to that instead of running on a fixed timer keeps blades supple enough to hold their bend. The Aiper IrriSense 2 covers up to 4,800 square feet across ten individually mapped zones and adjusts automatically based on real-time weather data, so there’s no watering the morning after rain and no dry stretch going unnoticed because the timer doesn’t know any better.
- Nutrient deficiency: Grass that’s low on nitrogen produces thinner cell walls, which means weaker blades that don’t hold orientation. Your lawn should be fertilized on a consistent schedule — a soil test from your county extension office ($10–20) will tell you exactly which nutrients are lacking and at what rates to apply them.
- Compacted soil: When roots can’t penetrate deeply, the grass is chronically stressed — and stressed grass can’t hold a stripe. If your lawn feels hard underfoot or water pools on the surface after rain, aerate in the fall for cool-season grasses or late spring for warm-season turf. For broader lawn health, keep weeds like dandelions in check — they compete for the same nutrients and water your grass needs to maintain blade flexibility.
- Mowing too short: Scalping the lawn removes most of the leaf surface area. Less blade means less surface to reflect light, which means weaker stripes. Never remove more than one-third of the grass blade height in a single mowing.
Frequently Asked Questions
Can you stripe a lawn without a roller?
Yes, but the stripes will be faint. The mower deck itself creates some airflow that bends grass in the direction of travel, and you’ll see a mild light-dark effect even without a roller. For visible, lasting stripes, you need a rear roller or a DIY striping kit. The good news: a PVC pipe filled with sand and mounted behind the mower costs under $30 and works nearly as well as a commercial kit. Search YouTube for “DIY lawn striper PVC” for step-by-step plans.
Is striping good for your lawn?
Striping itself doesn’t harm the grass — it’s just bending the blades, not cutting them. But consistently mowing the same direction without rotating can create a permanent lean in the turf as roots tilt over time. Rotating your pattern every few mowings prevents this and keeps the turf growing upright and healthy.
How do you get stripes in lawn with a push mower?
Attach a striping kit to the back of your push mower. Most kits ($50–150) bolt onto the rear of the deck and include either a weighted roller or heavy rubber flaps that drag behind the mower, pressing the grass down consistently across the full cut width. If your mower has a rear bag attachment, you may need to remove it first. The process is identical to using a riding mower — the equipment is just smaller.
How do you get a checkerboard pattern on your lawn?
Mow the entire lawn in one direction during your first session (say north-south). During your next session, mow perpendicular to the first pattern (east-west). Where a dark stripe from session one crosses a dark stripe from session two, you get a dark square. Where bright crosses bright, you get a light square. The key: you need the stripes from your previous mowing to still be visible when you mow the second direction, so plan to do this within 3–4 days of the first mowing.
What direction should you stripe your lawn?
Start with the direction that gives you the longest straight run — usually parallel to the property’s longest edge. If your house faces the street, consider mowing perpendicular to the house so the stripes lead the eye toward the home rather than past it. For curb appeal, stripes running parallel to the street look best from a passing car. After your first session, rotate 90 degrees every 2–3 mowings to prevent the grass from developing a permanent lean.